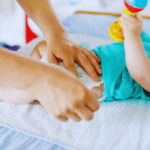
A portable diaper changing pad is a must-have for parents on the go. Store-bought options can be expensive, bulky, or not quite tailored to your needs. By making your own DIY diaper changing pad, you can customize the size, materials, and design to suit your baby’s comfort and your lifestyle. It’s an affordable, creative, and practical sewing project that also makes a thoughtful baby shower gift.
Whether you’re new to sewing or a seasoned crafter, creating a portable baby changing mat is simple with the right tools and step-by-step guidance. This article will walk you through everything from choosing fabrics to sewing instructions, ensuring the final product is washable, foldable, and travel-friendly. Plus, a handmade diaper changing pad is a sustainable alternative to disposable options. By the end, you’ll have a functional, stylish mat you can tuck into your diaper bag or car, ready for any changing emergency while out and about.
Materials and Tools You’ll Need

To make a durable and washable DIY diaper changing pad, you’ll need a few basic sewing supplies. Start with fabric: the top layer should be soft and comfortable for the baby, such as flannel or cotton. The bottom layer should be waterproof or at least water-resistant—PUL (polyurethane laminate) or vinyl-backed fabric works well. For padding, use quilt batting or foam for extra comfort. You’ll also need thread, scissors, pins or clips, a sewing machine, and a ruler or measuring tape. If you want the pad to be foldable, include hook-and-loop tape (Velcro), elastic bands, or snap fasteners to secure it when rolled up.
Optional but helpful tools include a rotary cutter and self-healing mat for precise cuts. Also consider prewashing the fabric to prevent shrinkage after sewing. Make sure your sewing machine needle is appropriate for heavy layers if you’re using thicker materials. Having everything prepared in advance will make the process smoother and help you finish the changing mat efficiently.
Step-by-Step Instructions to Sew Your Pad
Start by cutting your fabric into two equal rectangles—standard dimensions are around 24 inches by 18 inches, but you can adjust based on your needs. Cut your padding material to the same size. Layer the fabrics with the waterproof layer facing outward, then the padding, and the soft fabric on top, right sides facing each other. Pin them together securely.
Sew around the edges, leaving a small gap for turning the fabric right side out. After stitching, trim any excess fabric and carefully turn the pad inside out through the opening. Push out the corners using a chopstick or the blunt end of scissors. Then sew a topstitch around the entire edge, closing the opening in the process and reinforcing the structure. If you’re adding Velcro, snaps, or elastic bands, sew them on now—strategically place them so the pad folds neatly and stays closed. Once finished, test-fold it to ensure it closes securely and lies flat when opened.
Customization Ideas for Your Baby Changing Mat
One of the best parts of making your own portable diaper changing pad is the ability to customize it. You can choose fun, baby-friendly patterns or fabrics that match your diaper bag or nursery theme. Add a built-in pocket to hold wipes, diapers, or even a small tube of cream—great for quick changes without carrying the entire diaper bag. Consider adding a handle or strap for easy carrying. You can also personalize it with your baby’s name or initials using embroidery or iron-on letters. For eco-conscious parents, opt for organic cotton and bamboo padding for a more sustainable option. Want extra comfort? Use memory foam as padding. To make cleanup easier, choose stain-resistant or wipeable fabrics for the waterproof layer. You can even create a quilted look by sewing lines through the layers, which helps keep the padding in place during washing. Your changing pad will not only be functional but also uniquely yours.
Care Tips and Maintenance for Longevity

Proper care ensures your portable baby changing mat stays hygienic and lasts a long time. Always check the care instructions for your fabric choices—most cotton and PUL fabrics are machine washable. After each use, wipe down the waterproof layer to remove any messes. For deeper cleaning, toss the mat in the washing machine using cold water and a baby-safe detergent. Avoid fabric softeners, which can affect absorbency and waterproof layers. Air drying is best to maintain the integrity of the waterproof backing, but if machine drying, use a low-heat setting. If the mat includes Velcro or elastic, close or secure them before washing to prevent snagging. Inspect seams and closures regularly; if they loosen, re-stitch to reinforce them. Proper folding and storage help keep the pad compact and ready for travel. With consistent care, your handmade diaper changing pad can stay fresh, durable, and safe for daily use.
Tips for Making the Perfect Portable Diaper Changing Pad
Creating a portable diaper changing pad is straightforward, but a few smart tips can make it even better. First, always prewash your fabrics—especially cotton or flannel—to prevent shrinkage and ensure durability. Second, use coordinating thread colors for a clean finish, but contrast stitching can add a fun, stylish look if desired. When sewing with waterproof fabric like PUL, use clips instead of pins to avoid leaving holes that could lead to leaks. For padding, keep it thin enough to fold but thick enough to be comfortable. If you’re using batting, secure it with quilting lines to prevent bunching in the wash.
For added portability, sew on a carrying strap or snap fasteners so the pad folds into a clutch-like bundle. You can even add a loop to hang it on a stroller or hook. Always double-stitch high-stress areas, especially around closures like Velcro or elastic loops. If you plan to make several as gifts or for resale, consider creating a paper pattern to streamline your cutting and sewing process. Lastly, test the pad for usability—fold it, roll it, wipe it down—to ensure it meets your daily parenting needs and lasts over time.
Conclusion:
Making your own portable diaper changing pad is a rewarding and practical project that offers customization, cost savings, and convenience. Whether you’re sewing one for your own baby or crafting a thoughtful handmade gift, a DIY changing mat lets you control the materials, design, and features. It’s lightweight, foldable, and easy to clean—ideal for busy parents who want reliable solutions on the go. With just a few sewing tools and some simple steps, you can create a functional, stylish pad that makes diaper changes easier anywhere, anytime.
Beyond functionality, there’s also satisfaction in using something you’ve made with care and intention. It adds a personal touch to your baby gear while giving you full confidence in its safety and quality. Plus, by choosing washable and eco-friendly materials, you’re also contributing to a more sustainable lifestyle. Keep a few on hand—in your car, diaper bag, and at grandma’s house—so you’re always prepared. With the tips, tools, and instructions in this guide, your handmade changing pad will be a reliable companion for all your little one’s adventures.
FAQ:
1. What size should a portable diaper changing pad be?
A standard size is about 24″ x 18″, but you can customize it based on your preferences or bag size. Just ensure it’s large enough to fit a baby comfortably.
2. What’s the best fabric for the top layer?
Soft, absorbent materials like flannel, cotton, or even bamboo are ideal. They feel gentle against your baby’s skin.
3. What do I use to make it waterproof?
Use PUL (polyurethane laminate), vinyl-backed fabric, or oilcloth for the bottom layer. These materials are wipeable and prevent moisture from seeping through.
4. Can I wash the pad in the machine?
Yes! Most materials used—like cotton and PUL—are machine washable. Use baby-safe detergent and air dry to preserve quality.
5. How can I make the pad more travel-friendly?
Add snaps, Velcro, or elastic bands to keep it folded. You can also include a strap or pocket for wipes and diapers.